
ClueMe - パソコン用
バイ John Grauel
- カテゴリ: Lifestyle
- 最終更新日: 2021-09-30
- 現在のバージョン: 3.0
- ファイルサイズ: 8.52 MB
- 互換性: Windows PC 10, 8, 7 + MAC
バイ John Grauel


あなたのWindowsコンピュータで ClueMe を使用するのは実際にはとても簡単ですが、このプロセスを初めてお使いの場合は、以下の手順に注意する必要があります。 これは、お使いのコンピュータ用のDesktop Appエミュレータをダウンロードしてインストールする必要があるためです。 以下の4つの簡単な手順で、ClueMe をコンピュータにダウンロードしてインストールすることができます:
エミュレータの重要性は、あなたのコンピュータにアンドロイド環境をエミュレートまたはイミテーションすることで、アンドロイドを実行する電話を購入することなくPCの快適さからアンドロイドアプリを簡単にインストールして実行できることです。 誰があなたは両方の世界を楽しむことができないと言いますか? まず、スペースの上にある犬の上に作られたエミュレータアプリをダウンロードすることができます。
A. Nox App または
B. Bluestacks App 。
個人的には、Bluestacksは非常に普及しているので、 "B"オプションをお勧めします。あなたがそれを使ってどんなトレブルに走っても、GoogleやBingで良い解決策を見つけることができます(lol).
Bluestacks.exeまたはNox.exeを正常にダウンロードした場合は、コンピュータの「ダウンロード」フォルダまたはダウンロードしたファイルを通常の場所に保存してください。
見つけたらクリックしてアプリケーションをインストールします。 それはあなたのPCでインストールプロセスを開始する必要があります。
[次へ]をクリックして、EULAライセンス契約に同意します。
アプリケーションをインストールするには画面の指示に従ってください。
上記を正しく行うと、ソフトウェアは正常にインストールされます。
これで、インストールしたエミュレータアプリケーションを開き、検索バーを見つけてください。 今度は ClueMe を検索バーに表示し、[検索]を押します。 あなたは簡単にアプリを表示します。 クリック ClueMeアプリケーションアイコン。 のウィンドウ。 ClueMe が開き、エミュレータソフトウェアにそのアプリケーションが表示されます。 インストールボタンを押すと、アプリケーションのダウンロードが開始されます。 今私達はすべて終わった。
次に、「すべてのアプリ」アイコンが表示されます。
をクリックすると、インストールされているすべてのアプリケーションを含むページが表示されます。
あなたは アイコンをクリックします。 それをクリックし、アプリケーションの使用を開始します。
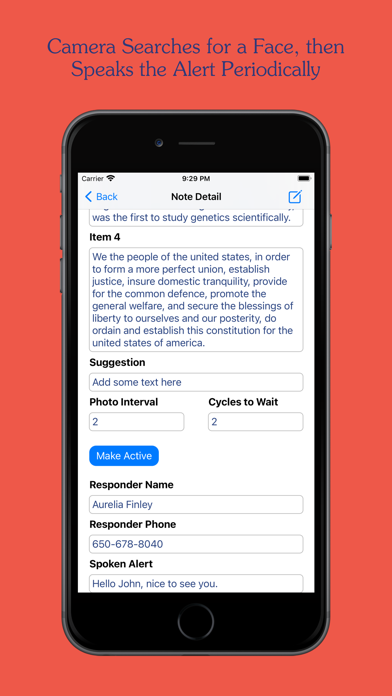
This app has two targeted applications. The app is a system to allow a caregiver to provide short reminder messages - photo, text and voice to a person with limited short term memory. It is also a dynamic bulletin board for general information. The app requires at least one iPad and at least one additional device (iPhone or iPad). All devices must be signed in to iCloud with the same Apple ID. The iPad(s) used for the Display functionality are permanently ON while the app is active and they display the messages. The Input device(s) are used to create and manage the database of messages as CloudKit records. The data is stored in an iCloud private database. The Display iPad takes a photo at intervals defined by the individual records. When a face (any) is detected, the Display iPad speaks a message as defined by a text field in the record. The Input device records control the interval between photos and the extended interval to wait once a face detection event occurs. The record also holds the text to be transcribed into the voice prompt. There is also a button that will allow the Display iPad user to make a phone call from iPad devices that are equipped to do so. The phone number and button title are included in the records. This build now allows an iPad to be the input device. Two or more devices are still required but a user could use two iPads - one for the Display functionality and one for the Input functionality. At iPad startup, the user chooses to make the iPad a Display or an Input Device. On background transition and return the iPad retains this choice. The voice prompts rely on the recipient looking at the Display iPad so the Display iPad should be in a position frequented by the recipient. Furthermore, it is important to be position such that the recipient looks at the iPad (camera). The camera is used to detect a face (any face, not face recognition). Once detected the Display iPad speaks the text that was entered into the record. The concept is that the recipient could be reminded to look at the screen where, for example, the daily diary is posted. Note that all devices must use the same Apple ID so it is necessary to physically control the Display iPad(s) or to use a special Apple ID to ensure that personal information is not discovered by force closing the app.